Showing posts with label sewing. Show all posts

Friday, December 7, 2012

DIY Homemade Doll

I have been having a lot of fun with my Esty shop lately! I added some fabric art I designed. I'm excited to start making projects with it.
This is the first project I made with my doll fabric. It is a gift for my daughter's birthday. I think it would be fun to add ribbons in the dolls hair or a little button on her dress. I didn't because my daughter is one and I didn't want pull things off and choke on them.
It was really simple to make. I just cut around the doll, sewed fabric to the back, and filled it with polyfil. Done!

WARNING: Suffocation hazard.

Tuesday, June 26, 2012

Handmade Shirt: How to Sew Sleeves

I've been wanting to sew a shirt for a while and I finally did! You should try it too. I was really happy that it worked since I didn't use a pattern. Mostly I was worried about sewing the sleeves. I've never made a shirt or anything with sleeves & heard they are really hard. After seeing this article and a tip from my friend I gained the confidence I needed to give it a try.


I think it turned out pretty well for my first shirt. Here are the tips I used for sewing the sleeves. I still have a lot to learn but here's a start...

1. Use a sleeve pattern: Don't try drafting your own sleeve. I got that tip from here. Since I didn't have a sleeve pattern, I cut the sleeve off an old button up shirt I had already chopped up for this banner.

2. Sew in the right order: My friend Wendy gave me this tip. I'm really glad she did! I would have never guessed that you sew the curve of the sleeve to the arm of your shirt first. Then sew under the arm and down the side of the shirt.

3. Use the right sleeve shape: I wanted my sleeves to have a little gather but didn't realize I needed to adjust my sleeve shape for this. Because of this my sleeves are a little tight. This article is great at explaining how to make different sleeve shapes.


A few more things I will do differently next time...

1. Take a before picture: I didn't take a picture of this old maternity dress that got handed-down to me. That is what I started from. It was nice because I didn't have to hem the bottom. I also ended up using the buttons & tie from it.

2. Taper your shirt from top to bottom: Mine ended up kind of bunchy under the arms because I just went straight down.

3. Scoop the neck: I tried to make the neck scoop a little in the front but it wasn't enough. It looked pretty funny so I cut it open and added the buttons from the old dress.

4. Add a tie: A wrap around the waist will help make your shirt look more fitted.

Now that I've overcome my fear of sleeves, next up is buttons and button holes...

Tuesday, March 27, 2012

Monster Tooth-Fairy Pillow Tutorial

We took my 5-year-old to the dentist last week and he had to get a tooth pulled. Poor guy was very upset about the whole thing. But, when he saw something about the tooth fairy on tv he got super excited.
I got excited about it too and couldn't resist looking up an idea for a special tooth fairy pillow. When I searched Pinterest there were tons of cute monster pillows with a little pocket to hold money. Perfect! This is how I made mine...
1. Gather your supplies: Scissors, needle and thread (or sewing machine), white felt, colored felt, black iron-on (or felt), ribbon for bow-tie, and ribbon for hair (not pictured).
2. Cut your felt pieces. I'm guessing mine are about: (2) 5 x 5.5 inches in blue, (2) 5 x 3.25 inches in blue, (2) 1.5 inches triangles in white, (1) 1.25 circle inches white, and (1) .75 inches in black (or iron-on material)
3. Make a felt sandwich. Layer (1) 5 x 3.25 inches piece, (2) triangles side-by-side as shown, and (1) 5 x 3.25 inches piece.
4. Sew along the edge about .25 inches from the edge. Turn right side out and it should look like this.
5. Make a bow. I did this by making one longer piece of ribbon into a circle and wrapping an shorter piece of ribbon around it going the other direction. Sew the "bow-tie" onto the piece below the triangles.
6. Attach the white and black circles to one of the 5 x 5.5 inch pieces as shown (about an inch from the top). Mine are one white piece of felt sewn on in an "x" and a black iron-on piece ironed on-top of that.
7. Make another felt sandwich. Place the piece with the eye, the piece with the teeth (line up with bottom), and then the other 5 x 5.5 piece.
8. Pin them together. Sew along sides and bottom.
9. Stuff with fiber fill.
10. Fold 4 pieces of ribbon (about 4 inches each) in half. Tuck and pin them inside the monster's head. Sew the top shut through the fabric and ribbons.

Let me know if you have questions. Hope your kiddos like it as much as mine!

Monday, March 19, 2012

Mouse Wrist Support Tutorial

Ok, so I'm pretty sure I have my wrist support upside down in the photo. Please forgive me. I've actually been using a pair of socks rolled up for my wrist support for quite a while. So, I'm still new to this. Anyway, if you use a computer quite a bit you need some kind of wrist support or your wrist will get really sore like mine.
Here's how I made mine. You may want to make a removable cover to go over this also.
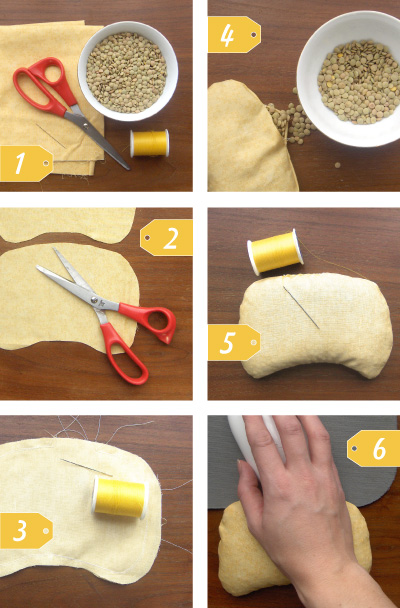
1. Gather your supplies: fabric, scissors, needle, thread, and lintels.
2. Cut 2 identical bean shapes out of your fabric (mine is about 8 inches by 5 inches).
3. Place wrong sides out and sew all along the edge, leaving a little opening for filling. I used my sewing machine. Cut notches.
4. Turn right side out. Fill with lintels. I used a piece of paper like a funnel to fill mine.
5. Sew up the opening.
6. Use the other way... I think. Whatever is comfortable I guess! :)

Monday, September 12, 2011

Easy DIY Placemats

We are trying to protect our table but I am getting tired of washing and ironing tablecloths. Sooo.. I decided to make some placemats. They are really easy to make.
1. Cut two pieces of fabric to your desired size. I cut mine 18 x 15 to maximize my fabric. I did one side white and the other patterned.
2. Place right sides in. Sew around three of the edges (kind of like a pillowcase).
3. Turn right sides out.
4. For the open side, hide your edges by folding them in about a half inch. Pin in place.
5. Sew a pretty edge all the way around the edge of the placemat.

Friday, June 3, 2011

Pencil Bag or Clutch

I made this little bag for my son's preschool teacher. I filled it with hugs, kisses, a note, and a teacher necklace. She loved it. It was inspired by the Make it and Love it Blog.

See, I have been doing projects. Ha! Check back tomorrow for another project by yours truly.

Friday, April 29, 2011

Sew Your Own Napkins

Want to sew your own pretty napkins? The Purl Bee can show you how. Not to mention the tons of other amazing things you can learn from the Purl Bee!

Friday, December 31, 2010

Flower Clips & Notebooks

A few years ago my in-laws started a fun tradition. The cousins draw names and exchange inexpensive or homemade gifts. This year I decided to make the gifts. I just used materials I had on had.
The flower clips were made with felt I cut by hand and added a little button and stitching. I attached the flowers to hair clips with a stitch and hot glue.
The notebook covers were made from scraps of scrapbook paper and stickers. I cut paper to go inside from notebook and copy paper. Then I folded the paper in half and punched holes through each sheet to tie the ribbon through.

I may still go to the dollar store and buy some pens to go with them. Other than that, they were free and simple to make. Success. Hopefully my nieces like them.

Monday, December 20, 2010

Ruffled Tree Skirt

Is this not one of the prettiest tree skirts you have ever seen? There is a tutorial on Prudent Baby. I am already making a "to-do list" for next year. This is #1.

Friday, December 3, 2010

Shrug from T-Shirt

I have really been wanting to try this with some of my too-short shirts. If you get to it before me, let me know how it goes.

Wednesday, November 17, 2010

Cake Bunting

Wow! I never cease to be amazed by the creativity out there. I found this cake bunting on Kiki La Ru's etsy shop via Urban Nest.

Saturday, November 13, 2010

Oscar's Car Play-mat

I tell you that Jill is seriously one amazing lady! Check out what she made. It took her over 50 hours. Wow!

Monday, November 8, 2010

Mini Pennant Banner & GIVEAWAY

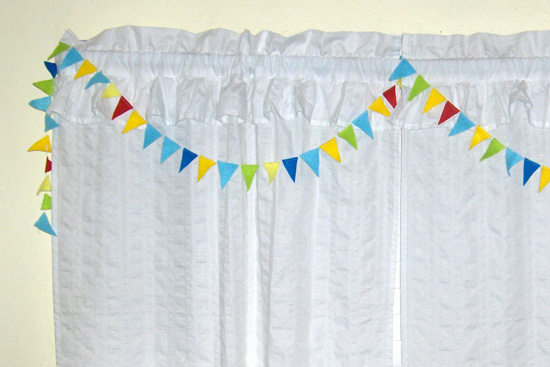
This banner really helps make the kids room more fun. It was inspired by a mini pennant banner Mandi made for work a while back. This version is really simple and inexpensive.
1. Cut out as many triangles as you want out of felt. Mine are about 1 inch wide and 2 inches tall. Stiff felt works best.
2. Sew along the top of your triangles. Feed one through right after the other. Mine fed better when I sewed close to the edge.
3. Keep going until you reach the length you want. Cut off any excess strings. Yay, You Made It!

This is a special giveaway to celebrating you, my 100 followers! So, not only am I giving away a lovely necklace. I also made an autumn mini banner with 100 pennants for this occasion.

You have until Saturday, the 13th, to enter the giveaway:
1. For one entry leave a comment on this post telling me where you would put the mini banner.
2. For an extra entry become a follower or let me know you already are a follower. Then make another comment letting me know.

Here's a special thanks to my followers!

Monday, November 1, 2010

Poison Ivy

I hope you had a great halloween! We did...trick-or-treating, carving pumpkins, watching the Great Pumpkin, and a little party.

This awkward picture kind of explains why I haven't posted for a while. After going on vacation I was in a mad rush to make our halloween costumes.
I decided instead of making a dress for my poison ivy costume I was just going to make a skirt, a vine, and spray paint some boots green. (I know it's surprising I didn't want to walk around in a sleeveless swim suit). It turned out to be a bigger project than I thought. On the up-side I now have an outfit for St. Patty's day, the jolly green giant, or a leprechaun.

Our 1 year old was Robin. I made him a cape, mask and little vest with an "R" on it to go over his green sleeper. Our 3 year old got a store-bought batman costume. My husband was Joker. We bought him a purple thrift-store jacket, dyed some white pants purple...hair and make-up and done.

What did you dress-up as? Do you make your own costumes too?

Monday, September 27, 2010

Laundry Closet Makeover

I have really been enjoying watching this laundry closet makeover fro Whimsy Lane Crafts. It makes me want to do mine too. Someday...after I finish the projects I have already started! Here is a link to how she made her own ironing board cover. I love how happy everything it is, especially that fabric. Now they just need to finish it (I know I'm one to talk)!

Wednesday, September 15, 2010

Finger Puppets

Aren't these finger puppets from Until Wednesday Calls sweet? She even made a tutorial for them. What a wonderful, simple idea. I wonder why I never thought of using iron-ons for these. Brilliant!

Tuesday, September 14, 2010

A Lemon Squeezy Home

I was so sad to loose all of the great blogs I had bookmarked when my computer crashed. Then I remembered, I e-mailed some of them to myself. I looked in my sent folder and there they were. Yay! I am so happy.Here is one of my re-found blogs, A Lemon Squeezy Home. This tissue pouch tutorial is what first lead me to this blog. I am so glad I found it because it is full of awesome ideas.

Saturday, September 4, 2010

Playhouse: Grass & Fireplace

I am going to have grass at the bottom all the way around the playhouse so I started by doing this on the side I wanted to make my fireplace on. Now I am debating whether I should have done the fireplace first. It's kind of tricky having things inside and outside the playhouse because you don't want your stitches to interfere with the design on the other side.For the grass I cut a 2-inch tall strip of green felt the legnth of one side of my playhouse. Then I cut 1-inch strips every 1/2 inch or so. You could cut your strips after you sew it on too. I don't know which is easier. Last I sewed my strip to the bottom of the playhouse, first doing a straight stitch, then a zig-zag.For the fireplace, you will need brown felt, scissors, black fabric, templates for the flames and log, and iron-on sheets or yellow, orange, & gray felt.Cut your flames and log out of your iron-on sheets or felt using your templates. The iron-on sheets weren't quite as tall as I wanted my flames so I used two sheets. To give you an idea of size, the orange flames are close to 12 x 12 inches.Cut a piece of black fabric to fit behind your flames. Mine is 20 x 18.5. Iron your flames and log onto the black or sew them if you are using felt.Cut strips of brown felt to create a mantle. Mine are 2 x 17.5 for the bottom, 3 x 17.5 for the sides, and about 5 x 26 for the top.The last step for the fireplace is sewing it all together. I placed everything as I wanted it, pinned like crazy, and sewed it together. Keep in mind, this is for my 3-year-old he doesn't care if my stitches are straight, so why should I ?

Thursday, September 2, 2010

Playhouse: Planning & Structure

Guess what? I started the playhouse! Finally!Quite a while ago I drew up this rough plan. It's nice to have a reference before I start but every time I look at it I think, "am I crazy? I am in way over my head!" I crossed out part because I decided I wanted to do something fun on the inside of the playhouse at the two ends, instead of so much on the outside.The other day I cut my fabric. I have seen some made out of felt, like Jill's. However, I decided to go with cotton fabric for the structure and bought each of these for $3 at Walmart. One twin size was almost the perfect size for the walls to fit around my table. I used brown for the "roof" and have plenty of leftover.

On a side note, did you know you can buy felt on a huge, long roll at the craft store? Most of it was $4.99 a yard + 40% off yesterday. You're right, Cristina much cheaper than buying rectangles!

Any questions on how to measure or plan? There will be plenty more playhouse projects to come. I hope you're up for it!

Wednesday, September 1, 2010

Free Baby Patterns

Before my computer crashed I had a file with quite the collection of awesome ideas. To help me cope losing all those files I have tried to recover some of the baby ideas I found.I have seen these pretty shoes done with all kinds of fabrics and sweet details (maybe a ribbon tie for a special little girl?). The free template and instructions are from Martha Stewart.Dana from MADE created tons of these cute diaper covers and provided a free template and instructions. This came at the perfect time because I was just thinking about trying to make a swim diaper cover for my 1 year old. Plus, what little baby girl doesn't need a stack of these?There are plenty of great ideas on Prudent Baby but this is one of my favorites. These swaddling blankets are so nice to have with a newborn. It's true that babies love to be swaddled. These are a little more complicated than the first two patterns, but make swaddling so nice, safe, and cute!