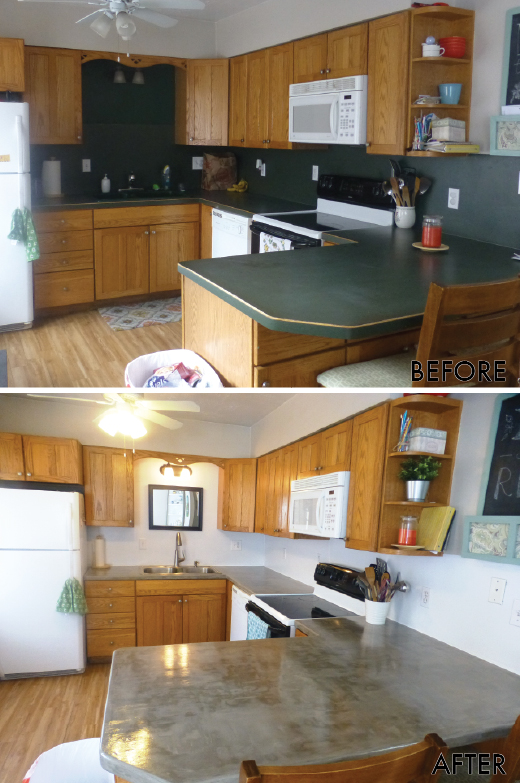
It's been 3 years since we applied feather finish concrete over our laminate countertops and I get lot's of questions about how they're holding up. Long story short, the feather finish holds up great! The only downside is oil leaves dark spots.
I ended up sanding them down, filling a few problems areas with more feather finish and re-doing the topcoat about a year ago. I used Surecrete XS-327 and liked that finish better than the original product I used.
Guess what else is new? We moved! I will be posting a home tour soon so you can see how things changed over the 9 years we were there. Also, there will be lot's of pictures of the new house as I decorate room by room.

Showing posts with label kitchen. Show all posts
Showing posts with label kitchen. Show all posts
Sunday, May 10, 2020

Monday, April 17, 2017
DIY Concrete Over Laminate Countertops Using Feather Finish
Hey, Everyone! I'm so excited to share my concrete countertops with you! I've been wanting to do this forever. The hunter green had to go!
I have done tons of research and felt like this was the best, budget-friendly option I could find for up-dating laminate countertops. I made a video to share the whole process with you.
I'm not a professional and this was my first time trying this. So, your results may vary.

The main steps are:
1. Prepare your home for dust & concrete.
2. Sand & clean your countertop to accept the feather finish.
3. Apply feather finish in about 4 thin, even layers.
4. Let it dry about 3 hours between layers.
5. Sand & clean your countertop between layers.
6. Apply 2 coats of 511 Impregnator about 1 hour apart. Cure for 24 hours.
7. Apply 3 coats of Safecoat Acrylaq in even strokes.
8. Let it dry about 3 hours between coats.
9. Sand between coats. But, not after final coat.
10. Cure for 24 hours.
I go through the entire process quite thoroughly in the video. So, I won't write too much more about it here. I also share the top 3 things I'd do differently.


I can't take credit for the original idea. Check out these other great blogs to read about their experiences:
1. Young House Love - Process >> Young House Love - Sealing Countertops
2. A Beautiful Mess >> A Beautiful Mess Using Ghostshield
3. Kara Paisley Designs
4. Design, Dining, Diapers
5. Little Green Notebook
6. Blesser House
If you decide to take a crack at this, please leave a comment with your tips. Good luck!
I have done tons of research and felt like this was the best, budget-friendly option I could find for up-dating laminate countertops. I made a video to share the whole process with you.
I'm not a professional and this was my first time trying this. So, your results may vary.
Check out this awesome green sink! It was sure heavy to take out. I'm surprised how much I love my new faucet.
1. Prepare your home for dust & concrete.
2. Sand & clean your countertop to accept the feather finish.
3. Apply feather finish in about 4 thin, even layers.
4. Let it dry about 3 hours between layers.
5. Sand & clean your countertop between layers.
6. Apply 2 coats of 511 Impregnator about 1 hour apart. Cure for 24 hours.
7. Apply 3 coats of Safecoat Acrylaq in even strokes.
8. Let it dry about 3 hours between coats.
9. Sand between coats. But, not after final coat.
10. Cure for 24 hours.
I go through the entire process quite thoroughly in the video. So, I won't write too much more about it here. I also share the top 3 things I'd do differently.
One of my favorite things is how the white outlets blend in so much better with the white backsplash instead of sticking out like a sore thumb.
I can't take credit for the original idea. Check out these other great blogs to read about their experiences:
1. Young House Love - Process >> Young House Love - Sealing Countertops
2. A Beautiful Mess >> A Beautiful Mess Using Ghostshield
3. Kara Paisley Designs
4. Design, Dining, Diapers
5. Little Green Notebook
6. Blesser House
If you decide to take a crack at this, please leave a comment with your tips. Good luck!
Wednesday, March 4, 2015
Gray Painted Cabinet
I stopped by one of my favorite and most inspiring blogs today and saw this fun mystery thrift-off application. I just love this idea! Go check out the Better After blog for details.
Anyway, I started to fill out all the entry info and when I got to the part about entering your blog address I kind of cringed. I have been such a slacker here since I started my Etsy shop! So, I'm going to start going through all my pics today and actually posting those DIY projects I've been working on over the past couple years. :)

First up is this corner cabinet I did last fall. My hubby brought this beauty home from the thrift store one day because apparently the hutch I painted before wasn't sturdy enough "in case of an earthquake".
This thing sat in my kitchen like this for probably a year! I hated it. But, I just couldn't decide what to do with it. This thing has wood mixed with some kind of MDF type stuff and it just wasn't working for me.
I thought about staining the wood a little darker, painting the outside white, adding stripes, trying wallpaper inside... Finally, one day I decided enough is enough. I'm just going to paint it and replace the hardware.

So, there you have it. Sometimes you just need to go for it! I love how it turned out. I think the gray makes it more timeless and sophisticated. It's not the wowzy piece I had in mind at first. But, I didn't necessarily want it to steal the show anyway. Besides, if I decide I don't like it, I can always change it later, right?


One of the biggest changes was cleaning all the dishes and re-arranging them. I grouped them by type of dish and color. Isn't it great how simple changes can make a big difference?
Anyway, I started to fill out all the entry info and when I got to the part about entering your blog address I kind of cringed. I have been such a slacker here since I started my Etsy shop! So, I'm going to start going through all my pics today and actually posting those DIY projects I've been working on over the past couple years. :)
First up is this corner cabinet I did last fall. My hubby brought this beauty home from the thrift store one day because apparently the hutch I painted before wasn't sturdy enough "in case of an earthquake".
This thing sat in my kitchen like this for probably a year! I hated it. But, I just couldn't decide what to do with it. This thing has wood mixed with some kind of MDF type stuff and it just wasn't working for me.
I thought about staining the wood a little darker, painting the outside white, adding stripes, trying wallpaper inside... Finally, one day I decided enough is enough. I'm just going to paint it and replace the hardware.
So, there you have it. Sometimes you just need to go for it! I love how it turned out. I think the gray makes it more timeless and sophisticated. It's not the wowzy piece I had in mind at first. But, I didn't necessarily want it to steal the show anyway. Besides, if I decide I don't like it, I can always change it later, right?
Saturday, September 17, 2011
Kitchen Re-do: Part 1
The kitchen is done... Well, for now. Part 2 will hopefully be next year after we get a tax return.
We would like to replace the tile. It's cracked pretty badly. We would also like to replace the countertop and backsplash. Surprisingly, I'm not digging the forest green. Also the forest green sink, leaky faucet, and fish hardware has to go. But, considering our budget I am happy with Part 1.


My in-laws gave us the white pantry you can see in the right corner. We put it together and replaced the wooden handles with silver hardware. I like how much brighter and cleaner it is than the wooden one we had there before.


Here is a detail of the wall by the door. There were such huge holes in our walls when we moved in, painting was a must. Love how calming the gray is.

I love the cheery yellow fabric I used for the kitchen window. A friend gave me a ton of it and I have used it for so many things. You can also see my dry-erase calendars and barstools in this photo.


I didn't do much to this area yet... that will be Part 2. But, I did paint above the sink forest green. I thought it was distracting were the backsplash ended.
Notice the toaster oven is gone? I had been looking for the perfect fabric for a cover, when my in-laws gave us the white pantry. It is bigger than our old pantry and had just enough room for the toaster oven. Yay!


Our dining area makes me happy! You can see the wanna-be china hutch I painted and gallery wall in this photo... two of my favorite house projects so far.


Here is a shot of the curtains I made. I used sheets again but this time added a little yellow ribbon edge. This also shows my easy centerpiece. I didn't use the place-mats in this photo but we use them all the time.
Awww... feels so good to have this room put together! I had a bit of panic recently realizing I only have 2 months until delivery and the budget is shot. So, the next several rooms will probably be faster, simpler, and more creative since I will be rushing to finish and using things on hand.

We would like to replace the tile. It's cracked pretty badly. We would also like to replace the countertop and backsplash. Surprisingly, I'm not digging the forest green. Also the forest green sink, leaky faucet, and fish hardware has to go. But, considering our budget I am happy with Part 1.

BEFORE

AFTER
My in-laws gave us the white pantry you can see in the right corner. We put it together and replaced the wooden handles with silver hardware. I like how much brighter and cleaner it is than the wooden one we had there before.

BEFORE

BEFORE
Here is a detail of the wall by the door. There were such huge holes in our walls when we moved in, painting was a must. Love how calming the gray is.

AFTER
I love the cheery yellow fabric I used for the kitchen window. A friend gave me a ton of it and I have used it for so many things. You can also see my dry-erase calendars and barstools in this photo.

BEFORE

AFTER
I didn't do much to this area yet... that will be Part 2. But, I did paint above the sink forest green. I thought it was distracting were the backsplash ended.
Notice the toaster oven is gone? I had been looking for the perfect fabric for a cover, when my in-laws gave us the white pantry. It is bigger than our old pantry and had just enough room for the toaster oven. Yay!

BEFORE

AFTER
Our dining area makes me happy! You can see the wanna-be china hutch I painted and gallery wall in this photo... two of my favorite house projects so far.

BEFORE

AFTER
Here is a shot of the curtains I made. I used sheets again but this time added a little yellow ribbon edge. This also shows my easy centerpiece. I didn't use the place-mats in this photo but we use them all the time.
Awww... feels so good to have this room put together! I had a bit of panic recently realizing I only have 2 months until delivery and the budget is shot. So, the next several rooms will probably be faster, simpler, and more creative since I will be rushing to finish and using things on hand.
Friday, September 16, 2011
Barstool Refresh
We purchased these barstools for $18 ($6 each). They were fine but well-used. The paint was really uneven and the fabric wasn't my fav.
 So I decided to do a little refresh. All it took was a few cans of spray paint, a can of lacquer, some fabric ($1 per yard), some new plastic, and our staple gun. It's not a dramatic change but they feel so much cleaner and more put together.
Check back tomorrow for the kitchen reveal... FINALLY!

Check back tomorrow for the kitchen reveal... FINALLY!
Monday, September 12, 2011
Easy DIY Placemats
We are trying to protect our table but I am getting tired of washing and ironing tablecloths. Sooo.. I decided to make some placemats. They are really easy to make.
 1. Cut two pieces of fabric to your desired size. I cut mine 18 x 15 to maximize my fabric. I did one side white and the other patterned.
2. Place right sides in. Sew around three of the edges (kind of like a pillowcase).
3. Turn right sides out.
4. For the open side, hide your edges by folding them in about a half inch. Pin in place.
5. Sew a pretty edge all the way around the edge of the placemat.

2. Place right sides in. Sew around three of the edges (kind of like a pillowcase).
3. Turn right sides out.
4. For the open side, hide your edges by folding them in about a half inch. Pin in place.
5. Sew a pretty edge all the way around the edge of the placemat.
Friday, September 9, 2011
Easy Centerpiece

Tuesday, September 6, 2011
Plastic Bag Dispenser

Thursday, September 1, 2011
Dry Erase Calendar
There are tons of things I still can't find from the move. One I miss a lot is our calendar. I am so used to checking the calendar and writing in important dates. I have been paranoid about forgetting things lately.
 So, finally I decided to make one. I purchased these two 8 x 10 frames from the thrift store for a dollar each and had my hubby spray paint them white for me. I kind of like how you can see the woodgrain. Then I designed and printed blank calendar pages to go in the frames. Click on the image below to download a free printable.
 Did you know you can write on glass with dry erase markers? My friend Mandi showed me this trick and it works like a charm. Just be careful not to erase anything important. :)

Friday, August 26, 2011
Botanical Gallery Wall

BEFORE
This was a pretty easy project. First I gathered a bunch of old frames I'm no longer using. Then I picked artwork and sized it to fit my frames. Most of the art is from Graphics Fairy. There are a few custom pieces... more on that later. Next I had my husband spray paint my frames white and filled them with the art.
AFTER
To make sure the placement was just right, I made paper templates of each frame, with spots marked for where nails should go. I hung them on the wall with tape until I got it right. I nailed right into the paper. Then tore the paper down and hung up my art.If you have a bunch of un-used frames I highly recommend this project. It really only cost me $3 for spray paint. I already had the frames, paper, and printer. This can be adapted to your style.
Thursday, August 11, 2011
Painted Cabinet
I have been dreaming of a pretty china hutch like the ones I see on other blogs all the time. Well I found the perfect one... and I couldn't afford it! So, I went to the thrift store and found nothing.
Then I realized all I need to be more open minded...even a cabinet with shelves placed on top would work or maybe shelves on the wall with a cabinet underneath. Luckily, the next time I went to the thrift store I found just the thing.

It looked pretty hideous at first. It is 100% fake. The backer is flimsy, it has a hole punched out and spaces to punch out for a tv to fit. But, happily I could afford it plus a little paint and hardware to fix it up.

I love how it turned out and it makes me happy to see my pretty dishes ready to use. It was so fun to spend the day of our 8th anniversary washing dishes we have had for years that I had no where to put. It kind of makes me wonder why I didn't do it sooner!
More kitchen projects coming soon!

Then I realized all I need to be more open minded...even a cabinet with shelves placed on top would work or maybe shelves on the wall with a cabinet underneath. Luckily, the next time I went to the thrift store I found just the thing.

BEFORE
It looked pretty hideous at first. It is 100% fake. The backer is flimsy, it has a hole punched out and spaces to punch out for a tv to fit. But, happily I could afford it plus a little paint and hardware to fix it up.

AFTER
I love how it turned out and it makes me happy to see my pretty dishes ready to use. It was so fun to spend the day of our 8th anniversary washing dishes we have had for years that I had no where to put. It kind of makes me wonder why I didn't do it sooner!
More kitchen projects coming soon!
Subscribe to:
Posts (Atom)