Nine years ago we moved into this beauty. The grass was completely dried up. There were bushes all across the front and wild trees right by the foundation.
We took out the bushes and overgrown trees and planted lot's of pretty flowers, my favorites were the double bloom daffodils and tulips. I painted the door a few times and ended up with this pretty blue color. Over time we spruced up the mailbox, got new exterior lights, door handle, roof, and took off that stained glass film on the windows.
We sold in the spring so you can't really see all the pretty perennials in bloom or how well the lawn greened up. But, I think it's good to know that if you move into a home with a dead lawn, there is hope. It takes some work. But, lawns can improve with TLC.
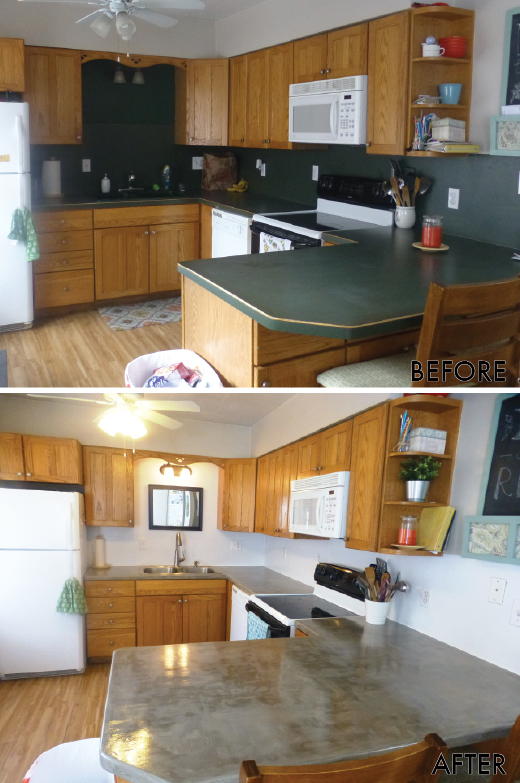
It's been 3 years since we applied feather finish concrete over our laminate countertops and I get lot's of questions about how they're holding up. Long story short, the feather finish holds up great! The only downside is oil leaves dark spots.
I ended up sanding them down, filling a few problems areas with more feather finish and re-doing the topcoat about a year ago. I used Surecrete XS-327 and liked that finish better than the original product I used.
Guess what else is new? We moved! I will be posting a home tour soon so you can see how things changed over the 9 years we were there. Also, there will be lot's of pictures of the new house as I decorate room by room.
Hey, Everyone! I'm so excited to share my concrete countertops with you! I've been wanting to do this forever. The hunter green had to go!
I have done tons of research and felt like this was the best, budget-friendly option I could find for up-dating laminate countertops. I made a video to share the whole process with you.
I'm not a professional and this was my first time trying this. So, your results may vary.
Check out this awesome green sink! It was sure heavy to take out. I'm surprised how much I love my new faucet.
The main steps are:
1. Prepare your home for dust & concrete.
2. Sand & clean your countertop to accept the feather finish.
3. Apply feather finish in about 4 thin, even layers.
4. Let it dry about 3 hours between layers.
5. Sand & clean your countertop between layers.
6. Apply 2 coats of 511 Impregnator about 1 hour apart. Cure for 24 hours.
7. Apply 3 coats of Safecoat Acrylaq in even strokes.
8. Let it dry about 3 hours between coats.
9. Sand between coats. But, not after final coat.
10. Cure for 24 hours.
I go through the entire process quite thoroughly in the video. So, I won't write too much more about it here. I also share the top 3 things I'd do differently.
One of my favorite things is how the white outlets blend in so much better with the white backsplash instead of sticking out like a sore thumb.
I'm so excited to finally share the special project I've been working on! It's a service kit I designed for the #LIGHTtheWORLD campaign! Learn about my kit, two more kits, and other ideas of how to use them on The Red Headed Hostess.
Special thanks to Made by Madie for filming my video! She's amazing. I edited it myself. It was my first time using the software and it was actually kind of fun. Thank you, Kristie for letting me use your lovely new home to film in. (She put up her Christmas decor early, just for me!)
The purpose of the kit is to help families follow Christ's example of service this Christmas. It doesn't take a lot of time, just pick one night to do this with your family. The kit I designed has 4 main parts:
PART #1: FAMILY DISCUSSION & GARLAND ACTIVITY
The first part is a discussion paper and gingerbread garland. Print out all the printables. Then, sit down together and talk about how Jesus served His loved ones. Think of your own examples, or use the examples from the discussion paper.
Have each family member share ideas of how they can serve. Each person can choose a gingerbread person from the kit, cut it out, punch holes in the hands and string them together with string, ribbon, or brads to create a cute garland.
My kids like to design their own. So, we printed the blanks ones and had each person color their own. It's fun to see their personalities shine through! Even me and my hubby got in on the fun. The only one missing is our 10 month old. He doesn't color yet. He'd probably eat the crayons! ;)
PART #2: GINGERBREAD COOKIE RECIPE
My photographer friend, Sarah, made these cookies for a Christmas party several years ago. They are so soft and yummy, I had to ask for the recipe! They are one of her family's specialties, she got the recipe from her mom, Linda. They like to put raisins on them, which is quite tasty.
My kids love to eat and decorate cookies. So, I knew I had to incorporate this into the kit. My kids are usually so excited to make some special cookies for themselves. But, this time I asked them to make some for someone else. They loved it! It made me so happy to hear them talk about the friends and cousins they were making them for.
If you haven't made these before, don't be intimidated by the fact that it starts out a little different than other cookie recipes. You boil the molasses and shortening together. Then, add baking soda dissolved in water. It's not hard! After that, it's just like any other cookie recipe. If you have helpers, like me, they are really fun to roll and cut out too.
PART #3: COOKIE OR GIFT BOX
This little cookie box was so fun to design! I knew I wanted to make a cookie box. I was trying to decide what it should look like. Then, it hit me! It needs to look like a gingerbread house, of course. Gingerbread people would live inside a gingerbread house. Ok, maybe I'm cheesy. But, I thought it was clever.
It's really simple to make! Just follow the directions on the sheet (print, cut, fold, glue & attach your ribbon). When you're done, you'll have a cute little box to put your cookies in to deliver. Really, you could put any gift you want inside.
PART #4: CHRISTMAS TAGS
Add a tag to your gingerbread cookie box or if your kids want to deliver their special cookies individually, you attach the tag to a little sandwich bag.
After you share your cookies and serve others, you can add more gingerbread people to your garland and see how long you can make it. I'm so excited to see what everyone does with this kit! I hope it will help other families serve this year.
Don't forget, to get 2 other service kits and ideas of how to use this kit, hop over to The Redheaded Hostess's site. More kits can be found on Sugardoodle and Lolly Jane soon. I hope you enjoy my gifts to you this year. Merry Christmas!!
*UPDATE: You can now download the files directly from my site, using the individual links throughout this post or DOWNLOAD THE ENTIRE SERVICE KIT HERE. Thanks for your patience!
I have some special Christmas gifts for you this year! First, I designed this printable with names of Christ for my church group to do a simple Christmas decoration for their home or gift. Now, I'm giving it to you! It comes in gold or silver (gray) so you can pick which works best with your decor.
Click on one of the links above to download the file you want. Print out the pdf from your home printer or send the jpeg to your favorite photo lab. Then, place it in an 8x10 inch frame (you can even find them at the dollar store!). Voila! You've got a pretty reminder of the reason for the season. These also make great Christmas gifts.
The next Christmas gift I have for you is a special surprise I will share on black Friday. I'm really excited about this one!
Please remember my freebies are for personal use only. Do not share, sell, or distribute my files. I retain all copyright. If you would like to share these, please link to this post, not the downloads directly.
Nearly a year ago I created this printable for The Aqua House and I still love it! It's such a great reminder that all things work together for good to them who love God. I'm so glad that Sara allowed me to design it for her.
Please only use this for your own personal projects (nothing commercial) and give credit where credit is due. Get your own 8x10 printable here.
I stopped by one of my favorite and most inspiring blogs today and saw this fun mystery thrift-off application. I just love this idea! Go check out the Better After blog for details.
Anyway, I started to fill out all the entry info and when I got to the part about entering your blog address I kind of cringed. I have been such a slacker here since I started my Etsy shop! So, I'm going to start going through all my pics today and actually posting those DIY projects I've been working on over the past couple years. :)
First up is this corner cabinet I did last fall. My hubby brought this beauty home from the thrift store one day because apparently the hutch I painted before wasn't sturdy enough "in case of an earthquake".
This thing sat in my kitchen like this for probably a year! I hated it. But, I just couldn't decide what to do with it. This thing has wood mixed with some kind of MDF type stuff and it just wasn't working for me.
I thought about staining the wood a little darker, painting the outside white, adding stripes, trying wallpaper inside... Finally, one day I decided enough is enough. I'm just going to paint it and replace the hardware.
So, there you have it. Sometimes you just need to go for it! I love how it turned out. I think the gray makes it more timeless and sophisticated. It's not the wowzy piece I had in mind at first. But, I didn't necessarily want it to steal the show anyway. Besides, if I decide I don't like it, I can always change it later, right?
One of the biggest changes was cleaning all the dishes and re-arranging them. I grouped them by type of dish and color. Isn't it great how simple changes can make a big difference?
Here is the download link. Please use and enjoy for your own personal use. Don't share sell or distribute my file. I retain all copyrights.
I hope you will use this design for your home, as a gift, scrapbook accent, or scale it down for a card. Don't forget, you are loved and God has not forgotten you! I promise. :)
I bought this really pretty nativity set as a teenager. It was really simple... Joseph, Mary, Jesus and 2 sheep. I loved that it was all white and I even glazed it and had someone fire it myself.
Sadly about a year ago my husband broke it while taking down the Christmas decor. He felt awful and so did I. It is one of those irreplaceable things.
I can't believe how expensive nativity sets are to buy, especially the pretty ones. So here is my solution. I bought this cheap set at the thrift store for $5. Add a can of semi-gloss ivory spray paint... Voila!
Not quite as lovely as my last set, but Christmas wouldn't have been the same without a nativity. I love that you can use this idea for any crazy nativity set you find. The ivory paint unifies it and makes it fit into any decor.
Don't settle for ugly house numbers! Both of the homes we have purchased came with these same ugly reflective house numbers. It was one of the first things I changed in both cases.
The secret to this mailbox is $1 can of black spray paint and a few bucks for some adhesive house numbers that I cut out and spray painted along with the label and lid.. Much better!
Just linked this project up to the William Morris Project. You should check it out here. It's really inspiring me to get rid of things and make things look prettier!
I finally finished the baby quilt! Yesterday my sewing machine was being moody but I decided to press onward anyway. After all, my little girl will be 6 months old in only a week.
I had a lot of fun gathering the fabric. Some were leftover squares from another quilt, some were from my mom's stash and others I bought at Walmart. I have been pretty impressed with some of their inexpensive prints lately. I really love the texture the eyelet adds.
I'm happy to say that now each of my kids has their own baby quilt made by me! Being the youngest of 10 children, I think it's important to have a few traditions that I do for each child.
So, now you would think the nursery is complete, right? Well, that's what I thought too, until I found this roll of wallpaper at the thrift store. Sorry, I'm going to leave you in suspense yet again!
Last week I got the office painted with Behr's Balmy Seas. I really love it! With all the Ikea shelves put up, things are coming together. I am so excited!
Here's another project I recently did for the office. I purchased this old chair for $3. You can't tell from this photo but the seat looked pretty yucky... like someone had an accident. So I bought a houndstooth skirt for $3 and cut it up for the cover.
I also added more padding to the seat using some foam I had leftover from another project and the padding from an old coat. I wouldn't recommend using the padding from an old coat again. There were feathers inside and it made a HUGE MESS! :)
I got the supplies for this project... embroidery hoops from the thrift store, strips of white fabric to cover them with, kite string, die-cut butterflies, and a glue gun. Then I turned it over to my friend Sarah to work her magic.
Didn't it turn out lovely? Right after I hung it my husband said it's like it raining in the nursery. The baby loves to look at it move when the heater comes on.
Here's a little close-up. It's so hard to capture how cool this is.
I added these ones to the wall behind the crib to make it even more of a focal point. I just rolled a little masking tape up and stuck to the middle of the butterfly die-cuts. Then, folded the wings up so they look like they are flying up the wall.
Here is a better photo by the same talented photographer friend who made the mobile, Sarah.
I bought these baby wipes with the intention of taking the label off and using them out of a plain white container. However, the sticker wouldn't come off easily so my friend, Kristie whipped up this cute little "cover-up" out of scrapbook paper.
I told my friend Mandi what I had in mind for this garland. With a some help from Kristie, she made it for me, except better! I am so lucky to have such great friends!
It took a little time to make but with a few paper punches and a sewing machine, it's a pretty simple project. It makes the room so fun, like a celebration every day... and it was practically free!
This rocking chair actually started out forest green. A few years ago I made a denim cover for it to fit the boys blue bedroom. Then came a girl. So, the blue had to go!
BEFORE
AFTER
Now it's yellow! I love this pretty yellow striped fabric. It makes me happy and it was free.
We got this hand-me-down side table from my husband's brother before we got married. It has been painted many times over.
BEFORE
AFTER
This time it's pink! I purchase a little custom-mixed 8 ounce sample of pink from Lowe's for about $3. It was supposed to be coral but turn out pepto. It's growing on my anyway, which is good because I'm too lazy to re-paint it right now.
Sorry for the lack of posts. I have been a little pre-occupied with our beautiful baby girl. Labor and delivery went as wonderfully as can be hoped for. We are all adjusting quite well. Thanks to grandpa & grandma, the nursery was all but finished when she arrived. I will start posting those pictures really soon!
Lately I have been inspired by all the amazing people who have been working hard to simplify their lives and homes. Check out Pancakes & French Fries 31 Days of William Morris and Apartment Therapy's The 20/20 Cure.
The main thing I am learning is de-cluttering, organizing, etc. takes time. It's all about doing a little something each day.
Hmmm... doesn't look like I did much here but it sure took a long time. It's the little things, I guess.
BEFORE
AFTER
First I re-painted the room. You really can't tell but the color I used is a few shades darker and a bit warmer than the original color. Awww... a fresh coat of paint. The pillows, silhouettes, and art are previous DIY projects.
BEFORE
AFTER
Here I touched up the dresser. There were tons of scratches from the move. I also added the "love letters" I repainted here.
BEFORE
AFTER
The biggest changes here are the re-painted dresser and curtains I sewed. One project you can't see is the fan re-do.
The nursery is next up! I have lot's of projects to share. Hopefully I will get those all finished and posted before the little one comes.